10 Wood Home Decor DIY Ideas

Woodworking has always been at the heart of home décor. It’s timeless, versatile, warm, and adaptable to nearly any interior style—from rustic farmhouse to sleek minimalist to cozy Scandinavian. More importantly, wood is one of the most DIY-friendly materials you can work with. Whether you’re a seasoned maker or a beginner with only a few tools, wood offers limitless opportunities to transform your home in meaningful, beautiful, and affordable ways.
DIY wood décor projects solve multiple needs at once: they personalize your space, add functional value, provide creative satisfaction, and often cost a fraction of store-bought décor. With simple tools like saws, sandpaper, nails, clamps, screws, and wood glue—and a bit of patience—you can create décor that feels authentic, high-quality, and made to last.
This guide covers 10 practical and inspiring DIY wood home-décor ideas, each explained with detailed reasoning, design variations, material breakdowns, techniques, styling tips, and build considerations. These projects range from simple to moderately advanced, giving you options whether you prefer a quick weekend project or a more involved build.
The goal is to empower you to not just copy designs, but to understand how they work, customize them, and confidently create décor pieces that reflect your personality and elevate your home.
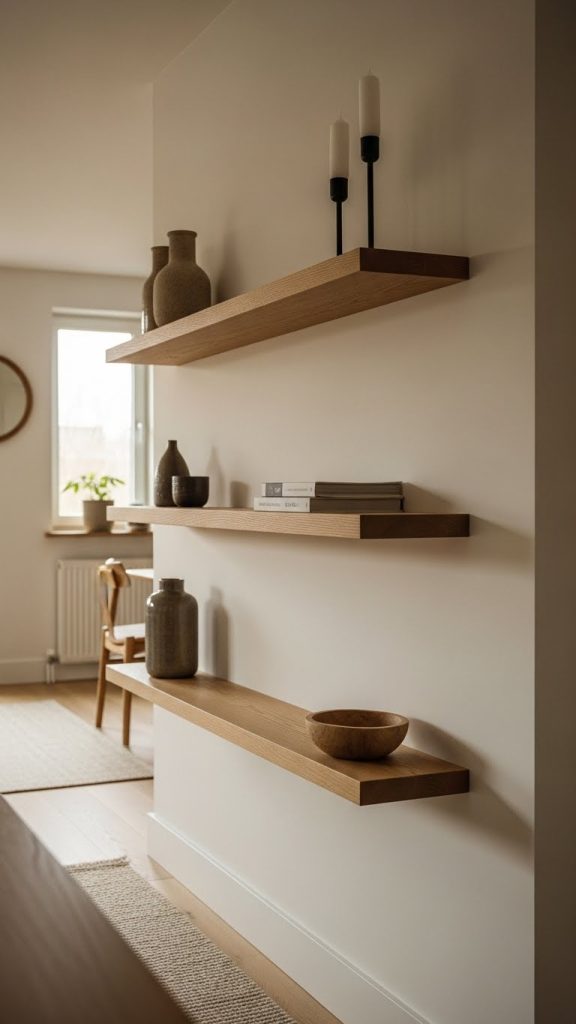
1. DIY Wooden Floating Shelves
Floating shelves are one of the most popular wood décor projects because they’re simple, functional, and stylish. They work in living rooms, bedrooms, kitchens, and even bathrooms.
Design Concept
The shelves mount with hidden brackets, giving them a clean, “floating” look. You can build them from solid wood boards or by constructing a hollow shelf around internal supports.
Materials
- Pine, oak, walnut, or laminated boards
- L-brackets or floating shelf brackets
- Screws and anchors
- Sandpaper (120–320 grit)
- Wood stain or matte sealer
Build Steps
- Cut boards to your desired shelf length.
- Sand smooth, rounding edges slightly for a finished look.
- Stain or seal the wood.
- Install support brackets into studs.
- Slide shelves onto brackets or mount boards directly.
Styling
Floating shelves fit minimalist spaces when styled lightly, or they can become feature walls when layered with books, art, and small plants.
Why It Works
It’s a simple build that instantly adds storage, décor, and architectural interest.
2. DIY Wooden Wall Art Panels
Wood wall art can be geometric, abstract, rustic, or modern. With scrap pieces or inexpensive lumber, you can create artworks that look high-end.
Design Concept
Arrange cut wood pieces into patterns—chevron, herringbone, mosaic, diagonal lines, or irregular shapes. Mount them onto a backing board and frame them.
Materials
- Scrap wood or trim strips
- Plywood backing
- Wood glue
- Clamps
- Stain in two or more tones
- Frame material
Build Steps
- Design your pattern on paper first.
- Cut wood strips at desired angles.
- Apply glue and place pieces onto plywood.
- Clamp until dry.
- Sand lightly and stain selectively to create contrast.
- Add a simple frame.
Styling
Wood art suits fireplace mantels, entryways, bedrooms, and gallery walls.
Why It Works
It creates artistic décor without requiring painting skills—texture becomes the artwork.

3. DIY Wooden Plant Stand
Indoor plants elevate a room, and a wooden plant stand adds height, proportion, and elegance.
Design Concept
Build a simple stool-style or cross-leg stand that holds a planter. Japanese and Scandinavian aesthetics influence modern plant stand designs.
Materials
- Hardwood dowels or square legs
- Wood for top ring or platform
- Screws or dowel joints
- Wood glue
- Saw and measuring tools
Build Steps
- Cut legs to equal lengths.
- Create cross supports or a ring frame.
- Attach legs securely with glue and screws.
- Sand smooth and finish with natural oil.
Styling
Pair with ceramic or terracotta pots for contrast.
Why It Works
Quick build, very useful, and works in all interior styles.

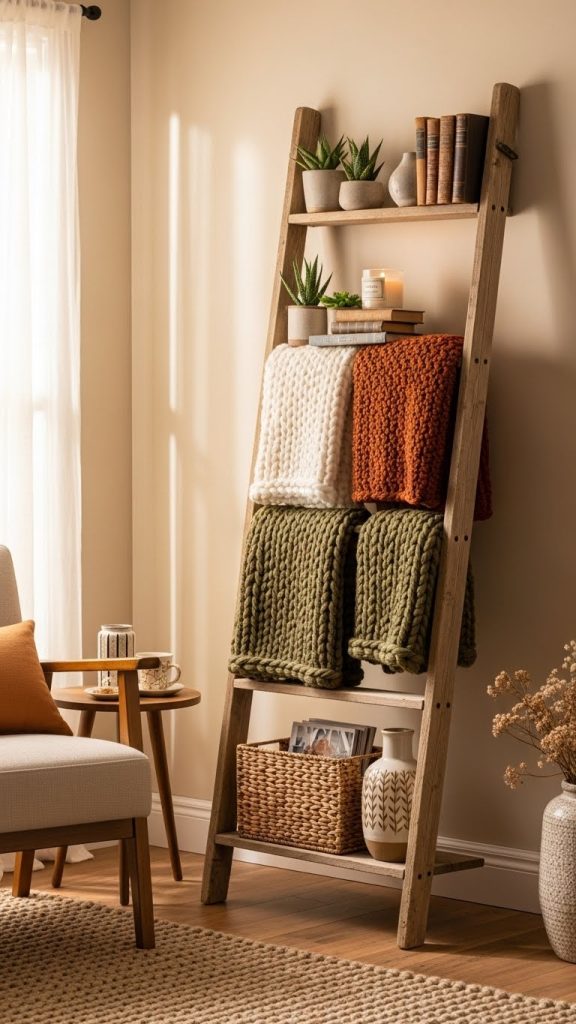
4. DIY Wooden Ladder Shelf (Decorative Leaning Ladder)
Leaning ladder décor is simple yet impactful. It doesn’t require permanent installation and offers both aesthetic charm and utility.
Design Concept
A narrow ladder made of two long side rails and evenly spaced rungs. It’s purely decorative—used to hang blankets, magazines, or lights.
Materials
- Two long wooden rails
- Short dowels or boards for rungs
- Wood screws
- Sandpaper and stain
Build Steps
- Cut rails and rungs.
- Drill angled holes for rungs.
- Insert rungs with glue and screw reinforcement.
- Sand and finish wood.
- Lean against a wall safely.
Styling
Use it in living rooms, bedrooms, or bathrooms to hold towels or throws.
Why It Works
It brings vertical height, texture, and rustic-modern charm while requiring minimal skill.
5. DIY Wooden Candle Holders
Wooden candle holders are simple, beautiful, and customizable. They create cozy ambience and act as stylish centerpieces.
Design Concept
Cut wood blocks or dowels into small columns, drill holes for candles, and finish them in natural tones.
Materials
- Wood blocks or dowels
- Drill + forstner bits
- Sandpaper
- Oil or stain
Build Steps
- Cut wood into varied heights for interest.
- Drill candle-sized holes.
- Sand edges round.
- Finish with oil or natural wax.
Styling
Arrange three to five candle holders of differing heights for a balanced composition.
Why It Works
They’re inexpensive, quick to make, and look artisanal.

6. DIY Wooden Coat Rack or Wall Hooks
Functional and stylish, wooden hooks or racks improve organization while serving as subtle décor.
Design Concept
Use wood dowels or carved blocks mounted onto a backing board or attached directly to the wall.
Materials
- A hardwood board
- Dowel rods or carved pegs
- Screws
- Wall anchors
- Finishing oil
Build Steps
- Cut board to length.
- Attach pegs at even intervals.
- Sand and finish.
- Mount securely into studs.
Styling
Use in entryways or bedrooms. Wood hooks also complement Japandi, Scandinavian, and modern homes.
Why It Works
It brings clean lines, warmth, and functionality.

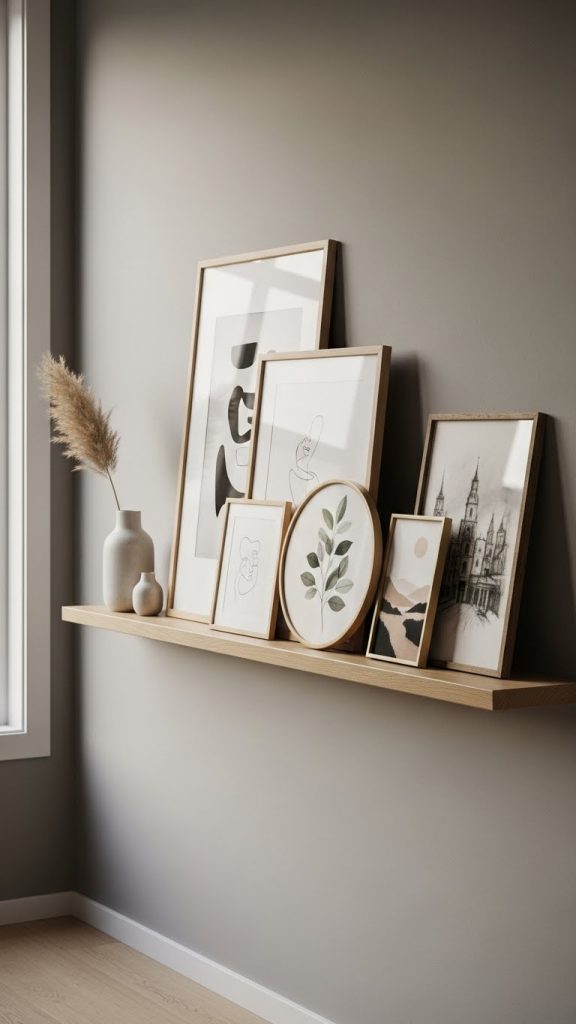
7. DIY Wooden Picture Ledge
A picture ledge is a narrow shelf designed to hold frames without hanging them individually. It’s beginner-friendly and extremely versatile.
Design Concept
Three pieces of wood form a small ledge with a front lip to keep frames from sliding.
Materials
- Three wood boards (front lip, backboard, base)
- Nails or screws
- Wood glue
- Paint or stain
Build Steps
- Attach the base to the back piece with glue and nails.
- Add the small front lip.
- Sand and finish.
- Mount to the wall using anchors.
Styling
Perfect for gallery wall arrangements and easy art rotation.
Why It Works
Minimal materials, high impact, and fits almost any décor style.
8. DIY Wooden Coffee Table (Simple Slab or Box Frame)
A wooden coffee table is a more advanced project but extremely rewarding. Even simple designs look custom and expensive.
Design Concept
Two popular DIY approaches:
- A thick wood slab with metal or wood legs
- A rectangular box frame with an open shelf below
Materials
- Hardwood boards or plywood
- Wood glue and screws
- Pocket-hole jig (optional)
- Sandpaper
- Finish oil or polyurethane
Build Steps
- Cut pieces to size.
- Join boards securely—either slab-style or box-frame.
- Add legs or a lower shelf.
- Sand thoroughly.
- Apply a durable finish.
Styling
Use trays, books, candles, or small plants. Keep styling minimal to highlight the craftsmanship.
Why It Works
A DIY table lets you customize size, tone, and design—perfect for unique living spaces.

9. DIY Wooden Wall-Mounted Organizer
A wall organizer is one of the most practical projects for entryways, kitchens, offices, or craft rooms.
Design Concept
A wooden board featuring hooks, small shelves, mail slots, key holders, and pegboard sections.
Materials
- Wooden board (pine or plywood)
- Small shelf pieces
- Hooks and pegs
- Screws and glue
- Stain or paint
Build Steps
- Cut wood components.
- Attach shelves and hooks strategically.
- Sand and finish.
- Mount securely to the wall.
Styling
Use strong, simple geometry and a natural wood finish for a clean look.
Why It Works
It adds daily convenience while creating a stylish, practical décor feature.

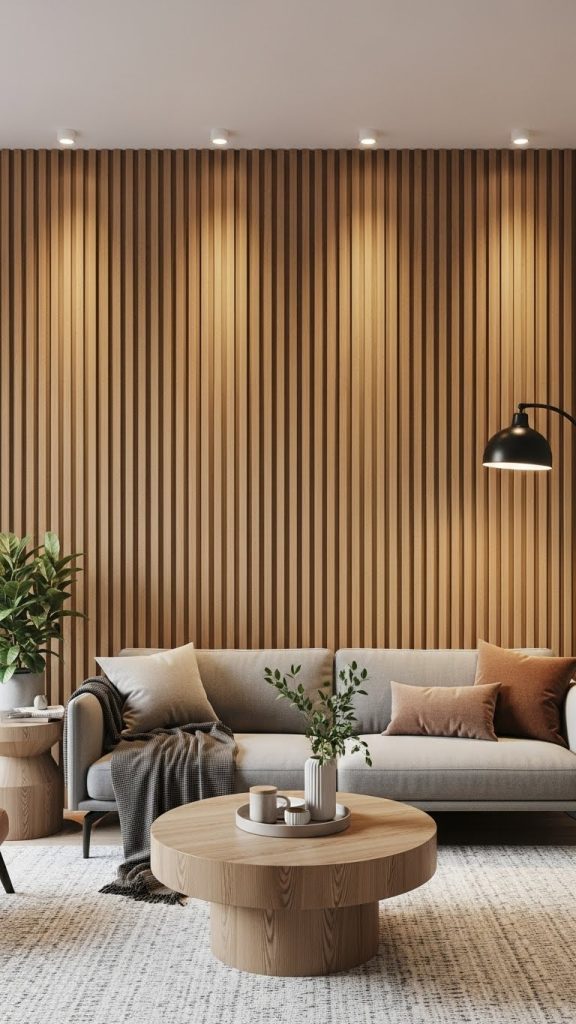
10. DIY Wooden Accent Wall (Slats or Panels)
A wood accent wall transforms a room instantly. It can be a full wall of vertical slats, rustic planks, geometric paneling, or modern minimalist boards.
Design Concept
Attach wood slats or panels directly onto a wall to create depth, warmth, and architectural interest.
Materials
- Wood slats or boards
- Finishing oil or stain
- Construction adhesive and nails
- Level and measuring tape
Build Steps
- Measure the wall carefully.
- Cut slats or panels evenly.
- Attach slats vertically or horizontally.
- Maintain consistent spacing.
- Sand and finish.
Styling
Wood accent walls work behind TVs, beds, fireplace mantels, and entryways.
Why It Works
It dramatically elevates a room without requiring major renovation.
Conclusion
Wood is one of the most rewarding materials for DIY décor. It’s strong yet workable, affordable yet luxurious, simple yet expressive. The ten projects explored in this guide—floating shelves, wall art panels, plant stands, ladder shelves, candle holders, coat racks, picture ledges, coffee tables, wall organizers, and accent walls—demonstrate the versatility and long-lasting appeal of wood in home design.
DIY projects not only personalize your surroundings but also foster creativity, pride, and meaningful connection to your home. Whether you choose an easy weekend build like candle holders or a more ambitious project like a coffee table, every piece you create adds character and story to your living space.
Wood décor blends beautifully with modern, rustic, minimalist, bohemian, Japandi, and Scandinavian styles. When crafted with care and intention, DIY wood pieces feel timeless, warm, and uniquely yours.